Hey there, fellow paleo enthusiasts! If you’re like me, you’ve probably found yourself wondering how to manage all your favorite grain alternatives in a way that keeps them fresh, tasty, and ready for cooking. In my experience, proper grain storage is key for maintaining the quality of our ingredients. Today, I’ll share some insights into the best options for storing grains while sticking to our paleo lifestyle. Let’s dive into the details!
Understanding the Different Grain Types
What Are Paleo-Friendly Grains?
So, when we talk about grains in the paleo context, we’re really referring to pseudo-grains like quinoa and amaranth, which are technically seeds. Understanding what they are is crucial because it helps you make better storage choices. Over the years, I’ve learned that these grains carry different properties and shelf lives, impacting how you store them.
For example, quinoa has a natural coating called saponin, which can cause bitterness. Storing it properly not only keeps it fresh but also minimizes that bad taste. I always rinse quinoa before storage to get rid of any residual bitterness—my quinoa-loving friends appreciate this!
Then there’s amaranth, another pseudo-grain. It’s got a nutty flavor and is rich in protein, which makes it perfect for breakfast. Proper storage prevents it from becoming stale, so I’ve learned to keep it in airtight containers to preserve that delightful taste.
Why Storage Matters
First off, I cannot emphasize enough how vital it is to store grains properly. Improper storage can lead to spoilage, pests, or loss of flavor. I’ve had my fair share of discovering pantry bugs in my bulk grain purchases, and lemme tell you, it’s a nightmare!
Beyond just keeping pests at bay, great storage keeps your grains tasting their best. I’ve done some taste tests, and you can really tell the difference when grains are freshly stored compared to those that have been sitting in an open bag for way too long. So, trust me—it’s worth the effort!
Finally, storing grains correctly allows you to purchase in bulk, which can save money over time. When I switched to a bulk buying practice, I realized the savings were substantial, as long as I managed the storage well!
Assessing Shelf Life
During my journey, I’ve spent a lot of time learning about grain shelf life. Knowing the lifespan of the grains you’re storing will help you rotate stock and use them while they’re at their best. I’ve got a chart in my pantry that really helps me keep track. For instance, quinoa can last for 2-3 years if stored properly, while amaranth usually has a shorter shelf life of about a year.
When I find grains nearing the end of their shelf life, that’s my cue to get creative in the kitchen! I would whip up some grain salads, bake them into bread, or even sprinkle them over my salads! It turns what could be waste into delicious meals.
So, keep that survival guide handy! Knowing when to use grains can really make a difference. It’s one of those little hacks that really plays a big role in a streamlined paleo lifestyle.
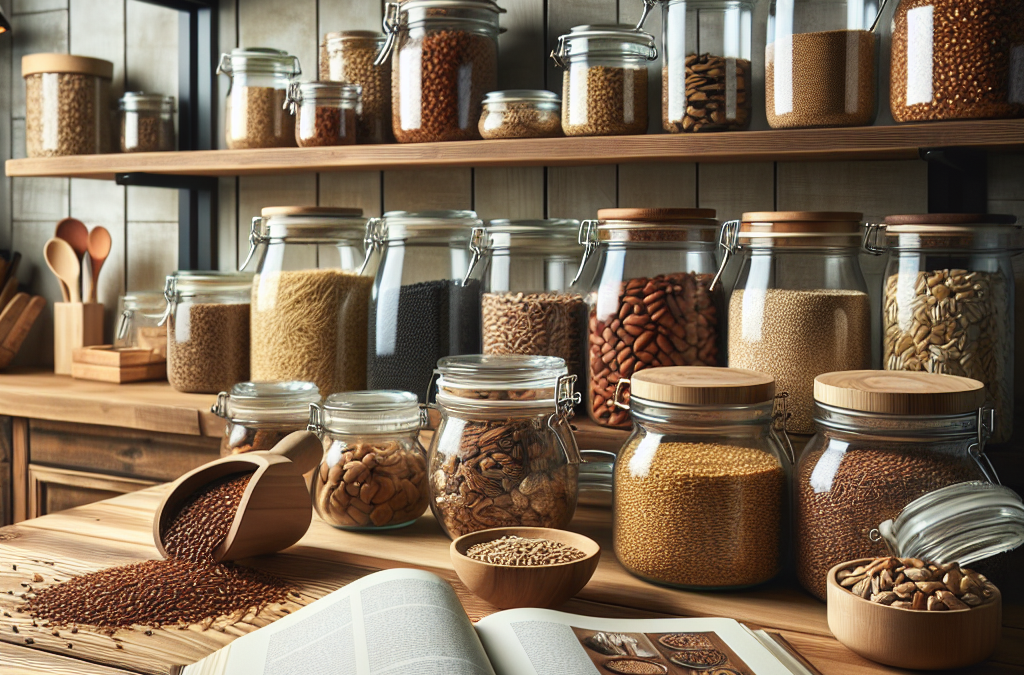
Best Storage Containers
Choosing the Right Material
Ah, the age-old debate: What’s the best material for your storage containers? Over time, I’ve experimented with glass, plastic, and metal, and I’ve got to say—glass is where it’s at! It’s non-reactive, which means no leaching into your beautiful grains.
Plus, glass containers don’t fade over time and can withstand a little heat, which is great for me since I sometimes store them near the stove. I also find that glass makes it easy to check on your grain supply—you can easily see when you need to refill!
However, if you’re all about lightweight options for travel or smaller spaces, high-quality plastic containers work too. Just be cautious with the types of plastic; I always go for BPA-free to keep things clean and safe.
Airtight vs. Non-Airtight
This is a biggie! You want your containers to be airtight, or you might as well just leave your grains out on the counter. I’ve had to learn this the hard way! I once stored my grains in a non-air-tight container only to discover that they lost flavor and went stale before I could use them. Never again!
Airtight containers lock out moisture and pests, which are two key enemies of stored grains. I recommend investing in some really good quality airtight jars or bins. It’ll protect your investment and ensure that your kitchen stays pest-free!
Plus, there’s something super satisfying about neatly arranged, labeled storage containers—am I right? It makes it so much easier to whip up meals when you can just grab a jar rather than rummaging through a big ol’ bag!
Labeling Your Grains
The organization is the name of the game here. I’ve found that clearly labeling my containers has saved me countless headaches. It might sound trivial, but believe me, it’ll make your life easier. There have been times I mistook buckwheat for a different grain, and you can imagine the cooking disaster that ensued!
When I label, I include not only the grain name but also the date I purchased or stored them. That way, I can keep track of freshness and ensure I’m cooking with the best ingredients possible. It’s almost like playing a game with myself to see how quickly I can use up what I bought!
I also love to get creative with my labels. Sometimes I draw little icons or write down quick recipe ideas, which helps make my cooking sessions a bit more fun. It’s like having a little roadmap in my pantry for delicious meals!
Temperature and Humidity Control
Finding the Perfect Spot
This one is crucial. I’ve realized that where I store grains can make a significant difference in their longevity. Keeping them in a cool, dry pantry is ideal—excess humidity can lead to clumping or even spoilage, and I never want to waste food!
In summer, I have to be extra cautious since heat can be an enemy. I make it a habit to check on my pantry environment and move things around if it’s getting too warm. On particularly hot days, I even pop my grains in the fridge just to keep them safe and sound!
Get Whole Wheat Flour, Grains and Milling Supplies – CLICK HERE
If you live in a humid environment, consider using desiccant packets in your containers. I started using those, and they really helped control moisture levels. Some might say it’s a small detail, but trust me, it’s one that has major payoffs down the line!
The Ideal Humidity Levels
I feel like humidity levels are often overlooked, but they really impact grain storage. In general, grains are best stored in environments with humidity levels below 50%. Over time, I’ve invested in a humidity gauge to keep an eye on things—it’s smart to be proactive!
If you open your pantry and notice that it feels damp or if condensation forms inside your containers, that’s a sign you need to act quickly. I usually try to avoid those areas in my home that can trap moisture. My grains deserve the best, after all!
Remember, consistency is critical. Make sure to regularly check the environment where you store your grains and make adjustments as needed.
Seasonal Adjustments
As seasons change, so do the storage needs for your grains. For instance, during heavy rainy seasons, I find myself being extra vigilant about keeping my storage area dry. I sometimes even set up a dehumidifier if needed, just to protect my precious stash!
In the winter, I pay attention too, as dry air can lead to grain dehydration. I’ve learned to inspect my grains for any signs of moisture loss during this time. Foods can become tasteless and crumbly if stored improperly, and I’m all about that flavor life!
Be flexible and make adjustments based on the seasons. It helps me maintain a successful storage system that works for me year-round.
Use By Practices
Rotating Grain Stock
I can’t stress the importance of rotation! I like to use the FIFO method: “first in, first out.” It’s a simple yet effective way to keep older grains from getting lost at the back of the pantry. I’ve made a habit of pulling the oldest items forward and placing newer purchases in the back.
Each time I refill my containers, I think about how many meals I want to create and what grains will go with them. This also keeps my recipes fresh and allows me to experiment with different grains, which is pivotal for sticking to a paleo style of eating.
And let’s be real, keeping track like this also proves to be a fun little challenge! Seeing how quickly I can use everything helps me stay engaged with my cooking and meal prepping.
Meal Planning with Grains
Another lifesaver for grain management is to incorporate meal planning. It allows me to identify which grains I need while taking inventory of what I have at home. Plus, it helps me avoid duplicate purchases. I can’t tell you how many times I’ve bought more quinoa, only to find I still had a whole jar stashed away!
When I take time to plan meals, I can utilize grains across different recipes. For example, using quinoa in salads, grain bowls, and even as a side dish will help me cover a ton of varieties and keep things interesting!
Honestly, it’s a win-win. My grains stay fresh, and I enjoy a diverse eat-in experience that makes sticking to paleo not only easier but exciting!
Creative Cooking Beyond Storage
Finally, I love getting creative in the kitchen with my grains. After all, thinking outside the box can lead to some of the most delicious meals! For example, using quinoa in breakfast recipes like porridge or switching up amaranth by incorporating it into baked goods opens up a world of possibilities.
Experimenting with different combinations and flavors keeps my meals enjoyable, so I never feel like I’m stuck in a food rut. Who would have thought grain storage could inspire culinary exploration? Well, it does!
Plus, when I bring friends over, I love to showcase my unique recipes. It’s an awesome way to share my passion for paleo living and prove that grains can be just as fun as traditional carbs!
FAQ
1. What are the best containers for storing grains?
The best containers for storing grains are airtight glass containers. They prevent moisture and pests from ruining your grains while also ensuring freshness.
2. How long can I store quinoa and amaranth?
Quinoa can last up to 2-3 years if stored properly, while amaranth typically lasts around 1 year. Make sure to check on them occasionally!
3. How important is it to control humidity and temperature when storing grains?
Extremely important! Keeping grains at a stable, low humidity and temperature helps to maintain freshness and prevents spoilage or pest infestations.
4. Why should I label my grains?
Labeling your grains helps you keep track of what you have, how long it’s been stored, and makes meal planning way easier!
5. How can meal planning assist with grain storage?
Meal planning allows you to efficiently use the grains you have, preventing waste and ensuring you’re making the most of your pantry staples while enjoying variety in your meals.
Get Whole Wheat Flour, Grains and Milling Supplies – CLICK HERE
Related Content
- The Ultimate Guide to 10 Effective Long Term Wheat Storage Strategies for 2025
- Whole Grain Breakfasts to Boost Your Day
- Grain Storage and Pest Control: Essential Methods for Protecting Your Harvest
- Grain Storage Racks: Maximizing Space and Accessibility
- Long Term Prepping Food Supply: Essential Foods for Sustainable Storage
Auto Amazon Links: No products found.