1. Understanding Hermetic Storage
What is Hermetic Storage?
When I first stumbled upon hermetic storage solutions, I wasn’t sure what the term actually meant. So, to put it simply, hermetic storage involves sealing items in a way that protects them from air and moisture. The idea is to create an airtight environment that keeps foods fresh, dry goods intact, and sometimes even sensitive documents safe.
This method is particularly beneficial for preserving food, as it helps to prevent spoilage caused by air and pests. Trust me when I say that getting to grips with this concept was a game changer for my pantry organization.
Plus, it’s not just for food. There’s a whole array of items that can benefit from hermetic storage including herbs, grains, and even electronics. Knowing how to implement this storage strategy has seriously upgraded my home organization game.
Benefits of Hermetic Storage
The perks of hermetic storage are pretty stellar. One of the most notable benefits is the preservation of freshness. If you’ve ever opened a bag of coffee that’s been sitting out for too long, you know what I mean—you lose that rich aroma and taste.
Another benefit I love is the reduction of waste. By effectively sealing foods, I’m able to keep items much longer, which saves me money in the long run. Honestly, I used to throw out so much food before I adopted hermetic storage; now, I can enjoy my grocery hauls for much longer!
Lastly, it’s a major pest deterrent. I can’t tell you how often I’ve had pantry moths invade my cabinets. With hermetic containers, I can keep those little pests at bay, which adds a layer of peace of mind to my kitchen organization.
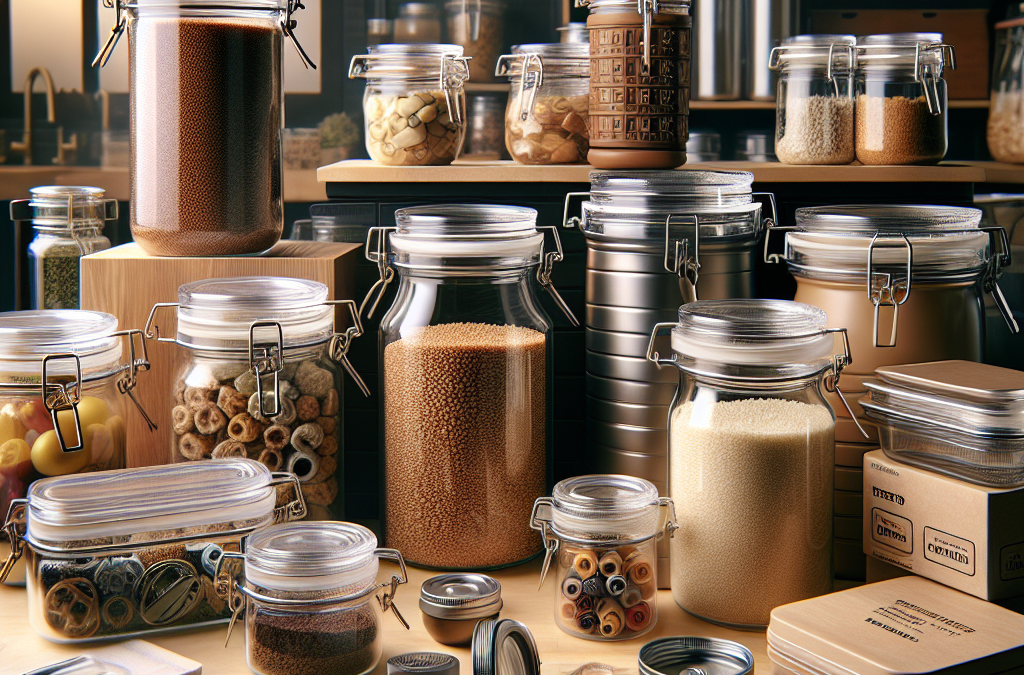
Common Hermetic Storage Materials
So now that we understand the basics, let’s chat about the materials used for hermetic storage. The most prominent ones are glass, plastic, and metal. Each comes with its own distinct advantages.
Glass containers are my personal favorite; they’re durable, won’t retain odors, and allow me to see what’s inside easily. Plus, they can be quite aesthetically pleasing on shelves. On the flip side, plastic containers are lighter and often easier to handle, especially for bulk storage purposes.
Metal canisters are another great option, particularly for items that shouldn’t be exposed to light. They’re fantastic for grains and flours, ensuring everything remains fresh and ready for use at a moment’s notice.
2. Choosing the Right Containers
Factors to Consider
When selecting hermetic storage containers, there are a few key factors to keep in mind. First, think about size. I’ve made the mistake of buying containers that are either too big or too small for my needs, leading to wasted space or overflow situations.
Next, consider material; each has its pros and cons. Glass is fantastic, but if it drops, it shatters—all too real from my past experiences! Plastic is generally more durable in those situations, but it doesn’t have the same longevity.
Lastly, ensure you check the sealing mechanism. I’ve tried containers that claim to be hermetic, yet their seals are just not up to snuff. Trust me— you want a solid lid that you know is going to keep air out and freshness in.
Popular Brand Recommendations
Over the years, I’ve tried numerous brands for my hermetic storage needs, and a few have stood out. One of my top choices is OXO Good Grips. Their containers are a delight, featuring a unique latch mechanism that makes sealing easy and reliable.
Another brand I swear by is FreshKeeper. They’ve got a variety of shapes and sizes which have been perfect for storing everything from my baking goods to snacks. And the best part? They’re affordable!
For a more high-end option, you can’t go wrong with Le Creuset. Their glass storageware is stunning, not to mention sturdy. It doubles as serving ware, which is a plus in a pinch!
DIY Versus Store-Bought Options
There’s a bit of a debate in the hermetic storage world, and I’ve dipped my toes into both DIY and store-bought options. For those crafty folks out there, you can create your own hermetic containers using mason jars, which is something I’ve enjoyed doing.
But let’s be real. Sometimes, you just want something that’s ready to go, and that’s where store-bought options shine. I’ve found that having a mix of both works best for my home. Store-bought containers for everyday use, Mason jars for herbs and spices—works like a charm!
Ultimately, it’s about what suits your lifestyle. Experiment a bit and see what works best for you!
3. Organizing Your Pantry
Assessing Your Current Setup
Before jumping into organizing, I like to take a good hard look at my pantry. It’s important to assess what you currently have, including any expired items that need tossing. Believe me, nothing feels better than clearing out old snacks!
Once the space is clear, I can see exactly what containers I need. I’ve often found items that were hiding in the back, which always gives me a pleasant surprise during my pantry refreshments.
Make sure to consider how you use your pantry. For instance, frequently used items should be easily accessible, while longer-lasting items can go in deeper corners. This small awareness makes a huge difference day to day!
Creating Zones for Different Items
Organizing by zones has truly revolutionized my pantry. By creating areas for baking needs, snacks, canned goods, and so much more, I can easily grab exactly what I need without digging through chaos.
I often suggest keeping similar items together. For example, my baking zone is lined with flours, sugars, and spices—all stored in their hermetic containers for maximum freshness.
Also, labeling each zone can save you time and energy. I like to use fun labels because it puts a little personality into my pantry while also keeping things simple and easy for my family to find stuff.
Maximizing Space
Especially in smaller kitchens, maximizing space is vital. I’ve had to get creative with vertical storage to make the most of every inch. Stacking containers is my go-to trick, as it not only frees up space but also makes it visually appealing.
Using clear containers helps showcase what you have, which encourages using ingredients before they go bad. I’ve also added tiered shelving to really take advantage of vertical height!
Get Whole Wheat Flour, Grains and Milling Supplies – CLICK HERE
Lastly, don’t forget the door! It’s often overlooked, but adding racks or hooks to the pantry door can provide extra spots for smaller items or tools.
4. Hermetic Storage for Food
Best Practices for Food Preservation
Preserving food with hermetic storage isn’t just about sealing it tight. I’ve realized that it’s crucial to ensure that the foods are clean and dry before storing. Trapped moisture can lead to that dreaded mold situation!
Try to avoid opening containers too frequently, because that can introduce air, ruining the hermetic condition. I generally ensure I’ve got the right size for what I’m storing so that I’m not opening a huge container for just a small amount of items.
Also, consider freezing certain foods before storage. It can make a world of difference, especially for items like meats or produce that you want to save for later. Simply seal them up tight and pop them in the freezer. Super easy!
What Foods Benefit Most?
After experimenting for years, I’ve concluded that grains, pasta, and dried fruits truly benefit from hermetic storage. These items are often sensitive to humidity, which can ruin their texture and flavor.
Foods like spices and herbs also thrive when hermetically sealed; they preserve their vibrant colors and potent aroma when kept away from air exposure.
Some people even store coffee beans and teas this way, ensuring a fresh brew every time. I can’t stress enough how game-changing it is to have freshly sealed coffee instead of stale grounds!
Long-term vs. Short-term Storage
When considering hermetic storage, I’ve learned that long-term and short-term storage require different strategies. For items you use regularly, like snacks or cereals, a medium-sized hermetic container works wonders.
On the flip side, foods meant for long-term storage—like grains or dry beans—should go into larger containers and be kept at cool temperatures to maximize preservation.
It’s all about matching the type of food with the right storage approach to avoid spoilage and preserve freshness as long as possible!
5. Maintenance of Hermetic Containers
Cleaning and Care Tips
One thing I’ve learned from my hermetic journey is that proper care goes a long way. For glass containers, I hand wash them to avoid damaging seals. It’s all about that careful touch!
Plastic containers? They are generally dishwasher-safe, which is a huge plus for quick cleanups. But, I always recommend double-checking labels—some can warp in high heat.
Whatever container you choose, maintaining a consistent cleaning schedule will ensure they last longer and perform better. Just a little upkeep goes a long way!
Identifying Signs of Wear and Tear
Over time, hermetic containers may show signs of wear. As I’ve learned, it’s crucial to regularly inspect your containers for any cracks or damages in the seals. If it doesn’t seem airtight anymore, it’s probably time to replace it.
Another thing to watch out for is odor retention in plastic containers. If they start smelling funky, it might mean it’s time for an upgrade. Nothing worse than stale scents lingering around your food!
By keeping an eye on these details, I’ve ensured that my hermetic storage solutions remain effective and safe for all my food needs.
How to Store Empty Containers
When it comes to storing empty hermetic containers, I’ve found a few tricks that work well. Nesting smaller containers inside larger ones is a space-saver and keeps everything organized.
For those with multiple styles of hermetic containers, it helps to keep like with like. This not only helps with maintaining the integrity of the items but also makes it easier to find what I need in a pinch.
Lastly, consider keeping a designated shelf or section for your empty containers. This way, I can quickly grab whatever I need when I’m prepping a new batch of snacks or meals!
Conclusion
Embracing hermetic storage has been one heck of a journey in my home, altering how I preserve food and organize my pantry. With a little understanding, the right containers, organized zones, and proper care, I’ve transformed my kitchen into a functional and stylish space. If you’re tired of stale snacks and frequent pantry cleanouts, I highly recommend hopping on the hermetic storage train!
FAQs
1. What is hermetic storage?
Hermetic storage involves sealing items in airtight containers to protect them from air, moisture, and pests, ultimately keeping products fresh for longer.
2. What types of containers are best for hermetic storage?
The best containers are usually made of glass, plastic, or metal, depending on your needs. Glass is durable and visually pleasing, while plastic is lightweight and often more affordable.
3. How can I organize my pantry effectively?
Start by assessing your current setup, create zones for different types of items, and maximize your space through stacking and shelving systems.
4. What foods benefit the most from hermetic storage?
Grains, dried fruits, spices, and even certain meats are excellent candidates for hermetic storage as they’re particularly sensitive to air and moisture.
5. How do I maintain hermetic containers?
Cleaning regularly, watching for signs of wear, and storing empty containers properly will help ensure your hermetic storage solutions remain effective and last a long time.
Get Whole Wheat Flour, Grains and Milling Supplies – CLICK HERE
Related Content
- The Ultimate Guide to Effective Grain Storage for Preppers in 2025 (10 Proven Tips)
- How to Use Grain Storage Charts for Better Management
- The Relationship Between Grain Storage and Food Security
- The Ultimate Guide to the 10 Best Containers for Grain Storage in 2025
- Food Storage Checklist for Preppers: Essential Items for Long-Term Preparedness
Auto Amazon Links: No products found.